Categories
-
Ordering & Fulfillment
- Complete Guide: How to get started & set up fulfillment on Merchize
- Create New Sample Orders in Merchize
- Create a Manual Order in Merchize
- How To Import Order to Merchize Manually
- How to create single & multiple products
- Create & Import orders for FBA Fulfillment
- How to set up Merchize x Order Desk Integration
- F.A.Q About Fulfillment Procedure On Merchize
- How To Fill In Tracking Code For Your Orders - All About Tracking Code On Merchize
- General Introduction to Merchize Store Administration
- Auto-Refill Stock Feature On eBay
- How To Add Phone Numbers To The Checkout Form
- How To Add Sub Account To Your Store
- How To Use The Functions In The Order Section
- How To Check If Your PayPal Account Has Mass Payment Or Not
- How To Connect PayPal Account To Pay Subscription & Transaction Fee Automatically.
- How To Contact Merchize Support
- How To Manually Import Orders on Merchize?
- How To Set Up A Schedule Time To Hold Orders And Wait For Orders To Be Pushed To Merchize Fulfilment System
- Connect Merchize to Shopify API via a Custom App
- How To Synchronise Fast Shipping Of Your Store With Fast Shipping Of Merchize?
- How To Use Load Presets
- Instructions for Personalized Product feature
- Introducing Generate Tracking Time Feature & Forward Mail Guideline For Team Member
- Refund Policy When Closing A Merchize Store
- Upgrade Production Statistics Version 2
- Brand Packaging Kit & Thank-you Card Features I Setup Guides
- Verify US Shipping Address
- How to Create a Custom Return Address
- How to cancel orders and items
- Upload multiple artworks to "different pieces of pack"
- Set up custom fulfillment workflow with conditional logic
- Show all articles ( 17 ) Collapse Articles
-
Integrations
- Connect Merchize to Shopify API via a Custom App
- How to set up Merchize x Order Desk Integration
- Create & Sync Products from Merchize to Shopify
- Create & Sync Products from Merchize to Etsy
- Create & Sync Products from Merchize to WooCommerce
- Create & Sync Products from Merchize to Ebay
- Amazon Integration: Connect & Fulfill Orders Automatically
- eBay Integration: Connect & Fulfill Orders Automatically
- How to configure and sync your Etsy orders to Merchize?
- Auto-Refill Stock Feature On eBay
- Google Shopping Custom Label User Guide
- Guideline To Integrate Email Marketing Klaviyo Solution On Your Merchize Store.
- How to sync orders automatically and fulfill from Shopify
- Integrate & Fulfill Orders From ShopBase
- Integrate WooCommerce Fulfill with Merchize
- Integration with Google Shopping
- Show all articles ( 1 ) Collapse Articles
-
Print & Mockup Guidelines
-
Payment & Billing
- How to take payments with PayPal
- Guideline to Merchize Payment
- General Introduction to Merchize Store Administration
- How To Connect PayPal Account To Pay Subscription & Transaction Fee Automatically.
- Set Up Payment In Merchize Setting - To Receive Payment From Customers
- F.A.Q About Fulfillment Procedure On Merchize
- How To Check If Your PayPal Account Has Mass Payment Or Not
- How To Contact Merchize Support
- Account Suspension and Restoration
- How to take payments with Payoneer
- How to take payments with LianLian
-
Delivery & Shipping
-
Storefront Setup
- How to create a storefront on Merchize and configure domain to connect to Merchize
- Add WWW To Your Store
- Bulk Import Products
- Bulk Add Tags For Multiple Products (Bulk Add Tags) Guideline
- General Introduction to Merchize Store Administration
- General Settings In Settings > General of Merchize
- Google Shopping Custom Label User Guide
- Guideline To Integrate Email Marketing Klaviyo Solution On Your Merchize Store.
- How To Add Product Review
- How To Add Promotion Bar For Your Storefront
- How To Add Sub Account To Your Store
- How To Bulk Edit Description
- How To Bulk Fixing Variants Prices In One Product
- How To Connect PayPal Account To Pay Subscription & Transaction Fee Automatically.
- How To Contact Merchize Support
- How To Create and Change Static Pages on Merchize (Shipping, Policy, etc.)
- How to create single & multiple products
- How To Create Free Shipping Code For Built-in Payment Store
- How To Edit Store Homepage on Merchize
- How To Fix The Price of a Series of Products
- How To Get Bing Site Verification Code
- How To Get Facebook Pixel ID
- How To Get Google Analytics Tracking ID
- How To Get Google Conversion Tracking Code
- How To Get Google Site Verification Code
- How To Get Google Tag Manager Container ID
- How To Get Store Sitemap Link
- How To Import Bulk Of Products From Shopify To Your Merchize Store
- How To Insert Code Into GTM To Change CSS Store
- How To Install Multi-pixel Using GTM
- How To Integrate The Feature Of Adding Multiple Facebook Pixel ID
- How To Manage And Create New Discount For Store On Marchize
- How To Prevent DDOS Attack By Using Cloudflare
- How To Set Up Facebook Conversion Api
- How To Set Up Free Shipping From $Xx On Merchize
- How To Set Up Shipping Rates With Merchize
- How To Synchronise Fast Shipping Of Your Store With Fast Shipping Of Merchize?
- How To Use Product Gallery
- Instructions for Preset feature
- Introducing Generate Tracking Time Feature & Forward Mail Guideline For Team Member
- Launching Upsell And Cross-Selling Features V1
- Product Import System
- Set Up Payment In Merchize Setting - To Receive Payment From Customers
- When Can Merchize Order Information Be Changed?
- Setting up the Menu Navigation Management feature for Store
- Show all articles ( 30 ) Collapse Articles
-
Features & Store Management
-
Other Functionalities & Settings
Instructions for Personalized Product feature
🇻🇳 Click here for Vietnamese version.
Personalized Product is a feature that allows buyers to create important elements of the product such as text and artwork according to their wishes during the purchase process. This feature provides customers with an enjoyable shopping experience and helps drive store sales. Join Merchize to see the instructions for use right away.
I. General information about Personalized Product module
- Target: Provide a feature that allows shoppers to personalize products.
- Module Personalized version 1.2 allows:
- Sellers create, view, edit, delete and manage personalized products.
- Buyers provide personalized content when ordering.
- Sellers view the details of personalized content at each order and upload the corresponding artwork according to the order.
II. Instructions for seller to create and manage Personalized product
1. Seller manage Personalized product
1.1 Seller creates Personalized product
Step 1: Seller logging into the system. Open Product> Create Personalized Product
-> Select product from Preset/Product
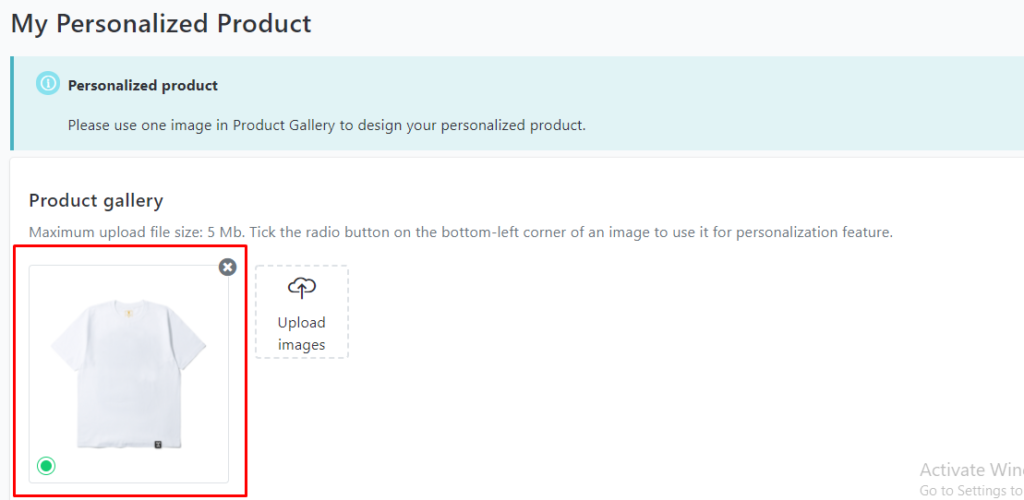
Step 2: Upload gallery picture of product
Step 3: Set up format for Elements
1. Main function
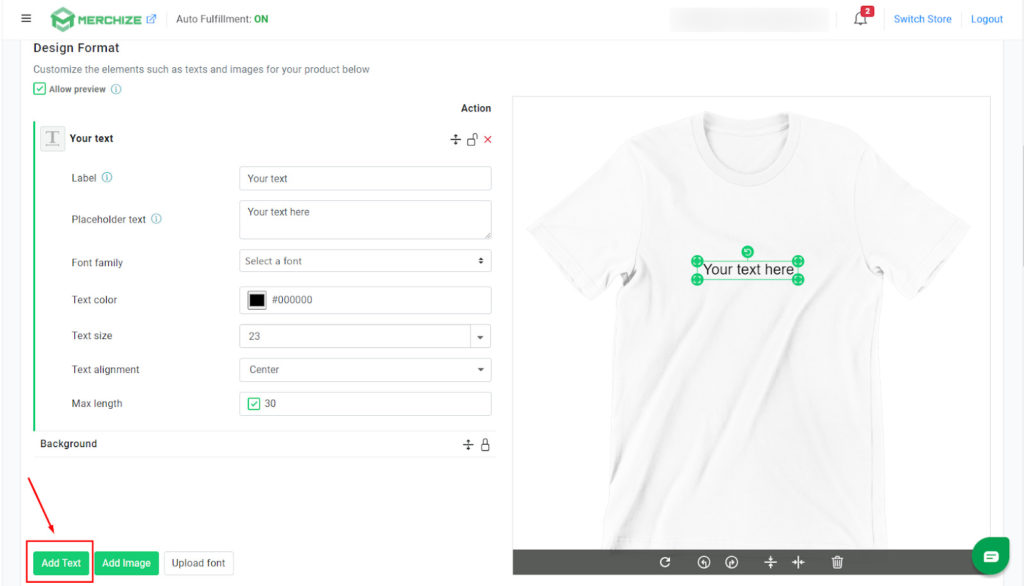
- Allow Preview: The feature allows Buyers to preview the product with the personalization elements they add to the product.
- Add Text, Add Image, Upload font.
- Drag/Move the element to the desired position.
- Lock/Unlock elements: Lock elements not for manipulation.
To add a Text element, Seller clicks [Add Text].
- Label: Upload the element name
- Placeholder text: Upload the text content
- Font family: Change the font style
- Text color: Change the text color
- Text size: Change the font size
- Text alignment: Align text
- Max length: Checkmark to allow Buyer to enter the maximum number of characters
<B> Image Element
To add an Image element, Seller clicks [Add image].
- Label: Upload the element name
- Placeholder Image: Upload the image, change the upload image
- Set up Max dimensions: The maximum width and height of the image allowed by Buyer to upload.
- Note for buyer: Enter the content of the note for Buyer
<C> Upload font
To add a new Font for the Text element, the Seller clicks [Upload Font], uploads the Font File to the system. Font File to upload needs to have a format (otf, ttf).
*Text Element: in the Font family section, click Select a font, the uploaded font is displayed in the Custom fonts section.
(*) You can save your favorite font by clicking on the ❤️ icon next to the font.
In addition, you can optionally change the sort order or delete/add elements in the Personalized product.
2. Design feature
- Drag/drop the image to change its position on the preview frame
- Rotate photo
- Delete photos
- Click on the Text/Image element on the preview to display the icon below the frame
: Reset element to its original position when not fixed
: Rotate to the left
: Rotate to the right
: Horizontal center
: Vertical center
: Delete selected element on Preview
3. Support Tooltip
Move the mouse pointer to the icons displayed the instructions
4. Upload product information: Title, Description
5. Upload product Attributes, Variants information
- [Save as draft]: Personalized product is successfully created as a draft, Seller is allowed to edit
- [Submit for review]: Personalized product is successfully created as pending approval, Seller is not allowed to edit
Note:
- The information is allowed to be edited and must be approved, including: Title, Description, Product gallery, Artworks, variant image.
- The information is allowed to edit and not need to be browsed: Collections, Tags, Facebook Pixel ID, Display, Price, select image variants as default.
- Each variant is only allowed to edit Price.
1.2 Seller edit/delete Personalized product
Step 1: Seller loggins into the system. Open Manage Product feature. Click Personalized product to edit or delete.
Step 2: Update product information. The steps are the same as when creating a Personalized product.
In case the Seller wants to delete the Personalized product, just click [Delete product], the Personalized product has been deleted successfully.
2. Buyer purchases Personalized product
2.1 Buyer upload Personalized product
The Personalized product created by seller will be displayed in the store as follow:
With Personalized products, Buyer must provide personalized product content by customizing Text, Upload Image for products. The position and format of Text, Image will be according to the position and format that Seller has set up on the Product.
To custom enter Text, upload Image for the product, Buyer need to:
Step 1: Buyer selects Personalized product needed to be bought
Step 2: Buyer uploads Text, Image of the Personalized products to purchase
2.2 Buyer selects to buy Personalized product
After Add to Cart, the screen will display all Personalized product information that Buyer has just ordered and move to Proceed to Check out.
At the Proceed Checkout screen, Buyer enters the required information as below:
After successful Check out, the Personalize product information that Buyer has just ordered will appear.
2.3 Buyer view Order Confirmation Email
After successfully purchased, Buyer would receive Order Confirmation Email automatically from the system
2.4 Buyer tracks order processing status
After successful order payment, Buyer can track the Order processing status by clicking the View order link on the Order Confirmation Email.
3. Seller manages Order
3.1 Seller views Order list
- At the Orders list:
- For non-customized orders, view detail is not given
- For Personalized orders, displaying the Order number as a link allows opening the Order detail screen
Step 1: Seller loggins into the system. Open Manage Order feature. The system will display all Store Order.
3.2 Seller view Personalized Order details
Step 1: Seller loggins into the system. Open Manage Order feature. Click Personalized Order to view details
Step 2: Seller views Personalized Order detail
The screen only shows personalized items, not the non-personalized ones.

