Categories
-
Ordering & Fulfillment
- Complete Guide: How to get started & set up fulfillment on Merchize
- Create New Sample Orders in Merchize
- Create a Manual Order in Merchize
- How To Import Order to Merchize Manually
- How to create single & multiple products
- Create & Import orders for FBA Fulfillment
- How to set up Merchize x Order Desk Integration
- F.A.Q About Fulfillment Procedure On Merchize
- How To Fill In Tracking Code For Your Orders - All About Tracking Code On Merchize
- General Introduction to Merchize Store Administration
- Auto-Refill Stock Feature On eBay
- How To Add Phone Numbers To The Checkout Form
- How To Add Sub Account To Your Store
- How To Use The Functions In The Order Section
- How To Check If Your PayPal Account Has Mass Payment Or Not
- How To Connect PayPal Account To Pay Subscription & Transaction Fee Automatically.
- How To Contact Merchize Support
- How To Manually Import Orders on Merchize?
- How To Set Up A Schedule Time To Hold Orders And Wait For Orders To Be Pushed To Merchize Fulfilment System
- Connect Merchize to Shopify API via a Custom App
- How To Synchronise Fast Shipping Of Your Store With Fast Shipping Of Merchize?
- How To Use Load Presets
- Instructions for Personalized Product feature
- Introducing Generate Tracking Time Feature & Forward Mail Guideline For Team Member
- Refund Policy When Closing A Merchize Store
- Upgrade Production Statistics Version 2
- Brand Packaging Kit & Thank-you Card Features I Setup Guides
- Verify US Shipping Address
- How to Create a Custom Return Address
- How to cancel orders and items
- Upload multiple artworks to "different pieces of pack"
- Set up custom fulfillment workflow with conditional logic
- Show all articles ( 17 ) Collapse Articles
-
Integrations
- Connect Merchize to Shopify API via a Custom App
- How to set up Merchize x Order Desk Integration
- Create & Sync Products from Merchize to Shopify
- Create & Sync Products from Merchize to Etsy
- Create & Sync Products from Merchize to WooCommerce
- Create & Sync Products from Merchize to Ebay
- Amazon Integration: Connect & Fulfill Orders Automatically
- eBay Integration: Connect & Fulfill Orders Automatically
- How to configure and sync your Etsy orders to Merchize?
- Auto-Refill Stock Feature On eBay
- Google Shopping Custom Label User Guide
- Guideline To Integrate Email Marketing Klaviyo Solution On Your Merchize Store.
- How to sync orders automatically and fulfill from Shopify
- Integrate & Fulfill Orders From ShopBase
- Integrate WooCommerce Fulfill with Merchize
- Integration with Google Shopping
- Show all articles ( 1 ) Collapse Articles
-
Print & Mockup Guidelines
-
Payment & Billing
- How to take payments with PayPal
- Guideline to Merchize Payment
- General Introduction to Merchize Store Administration
- How To Connect PayPal Account To Pay Subscription & Transaction Fee Automatically.
- Set Up Payment In Merchize Setting - To Receive Payment From Customers
- F.A.Q About Fulfillment Procedure On Merchize
- How To Check If Your PayPal Account Has Mass Payment Or Not
- How To Contact Merchize Support
- Account Suspension and Restoration
- How to take payments with Payoneer
- How to take payments with LianLian
-
Delivery & Shipping
-
Storefront Setup
- How to create a storefront on Merchize and configure domain to connect to Merchize
- Add WWW To Your Store
- Bulk Import Products
- Bulk Add Tags For Multiple Products (Bulk Add Tags) Guideline
- General Introduction to Merchize Store Administration
- General Settings In Settings > General of Merchize
- Google Shopping Custom Label User Guide
- Guideline To Integrate Email Marketing Klaviyo Solution On Your Merchize Store.
- How To Add Product Review
- How To Add Promotion Bar For Your Storefront
- How To Add Sub Account To Your Store
- How To Bulk Edit Description
- How To Bulk Fixing Variants Prices In One Product
- How To Connect PayPal Account To Pay Subscription & Transaction Fee Automatically.
- How To Contact Merchize Support
- How To Create and Change Static Pages on Merchize (Shipping, Policy, etc.)
- How to create single & multiple products
- How To Create Free Shipping Code For Built-in Payment Store
- How To Edit Store Homepage on Merchize
- How To Fix The Price of a Series of Products
- How To Get Bing Site Verification Code
- How To Get Facebook Pixel ID
- How To Get Google Analytics Tracking ID
- How To Get Google Conversion Tracking Code
- How To Get Google Site Verification Code
- How To Get Google Tag Manager Container ID
- How To Get Store Sitemap Link
- How To Import Bulk Of Products From Shopify To Your Merchize Store
- How To Insert Code Into GTM To Change CSS Store
- How To Install Multi-pixel Using GTM
- How To Integrate The Feature Of Adding Multiple Facebook Pixel ID
- How To Manage And Create New Discount For Store On Marchize
- How To Prevent DDOS Attack By Using Cloudflare
- How To Set Up Facebook Conversion Api
- How To Set Up Free Shipping From $Xx On Merchize
- How To Set Up Shipping Rates With Merchize
- How To Synchronise Fast Shipping Of Your Store With Fast Shipping Of Merchize?
- How To Use Product Gallery
- Instructions for Preset feature
- Introducing Generate Tracking Time Feature & Forward Mail Guideline For Team Member
- Launching Upsell And Cross-Selling Features V1
- Product Import System
- Set Up Payment In Merchize Setting - To Receive Payment From Customers
- When Can Merchize Order Information Be Changed?
- Setting up the Menu Navigation Management feature for Store
- Show all articles ( 30 ) Collapse Articles
-
Features & Store Management
-
Other Functionalities & Settings
How To Create and Change Static Pages on Merchize (Shipping, Policy, etc.)
🇻🇳 Click here for Vietnamese version.
When creating a store on the Merchize platform, the system automatically generates a series of static pages to comply with the regulations of stakeholders such as Google Shopping, or to ensure legality. These static pages also play a great role in increasing the store’s credibility with customers and are the base for handling customer dispute, return, refund cases. However, because each store will have a different way of working, selling different types of goods, etc., some stores will have the need to change the content of static pages accordingly. For example, Dropshipping sellers will need to change the shipping price and shipping time because dropship products will have different shipping times, specifications, and shipping fees than POD products. There are also stores, Google Shopping requires some additional information (eg return, refund, etc.) that the store owner will want to change the static page content. To change the static page content, you can go to page Settings > Pages.
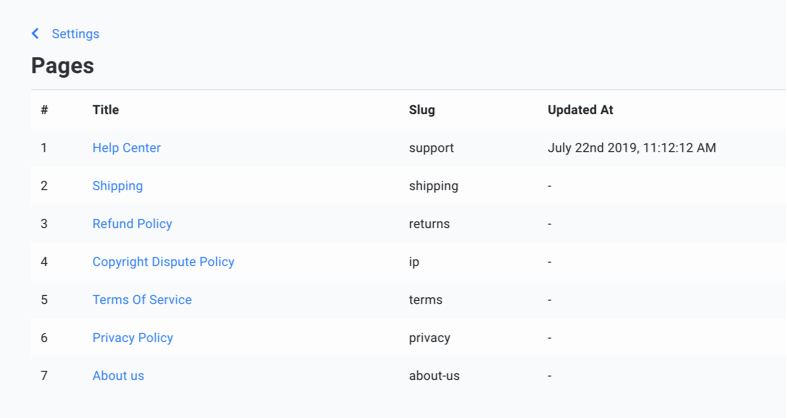
This is the static page content management section. you can see information of static pages such as name, slug (behind the link), and update time. Now, to edit the content on any page, you can click on that page to start changing the content.
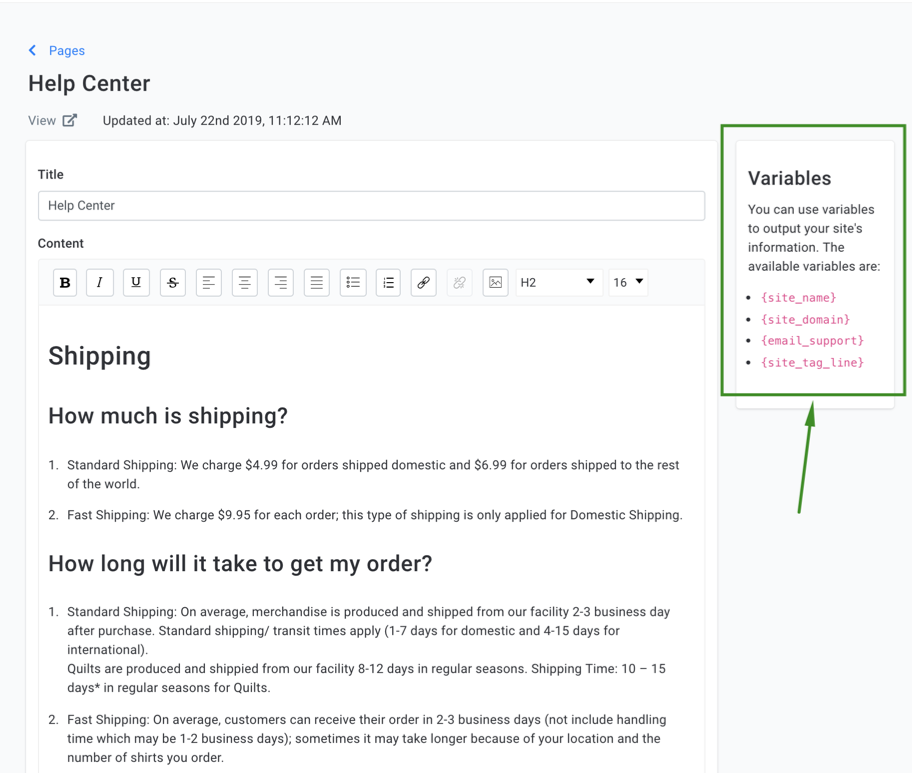
This is an example of a change in the content of the Help Center page. To ensure the change of the store (for example, if you want to change the support email later, change the tag line of the store, the name of the store, etc.), Merchize has added a Variables item. You can copy/paste the variables according to the instructions below to display the correct information recorded on the system, ensuring the information is consistent after each change. For example, you are currently using email support as support@merchize.co, in a static page you can write: “Please send us an email at support@merchize.co.” – Or you can also write: “Please send us an email at {email_support}”. Visitors will then also see the text “Please send us an email at support@merchize.co”. After you have finished changing the content, click Save.


